
Ingredients
3 cups all purpose flour
1 1/4 tsp salt
10 egg yolks
1 egg
6 tbsp milk
Instructions
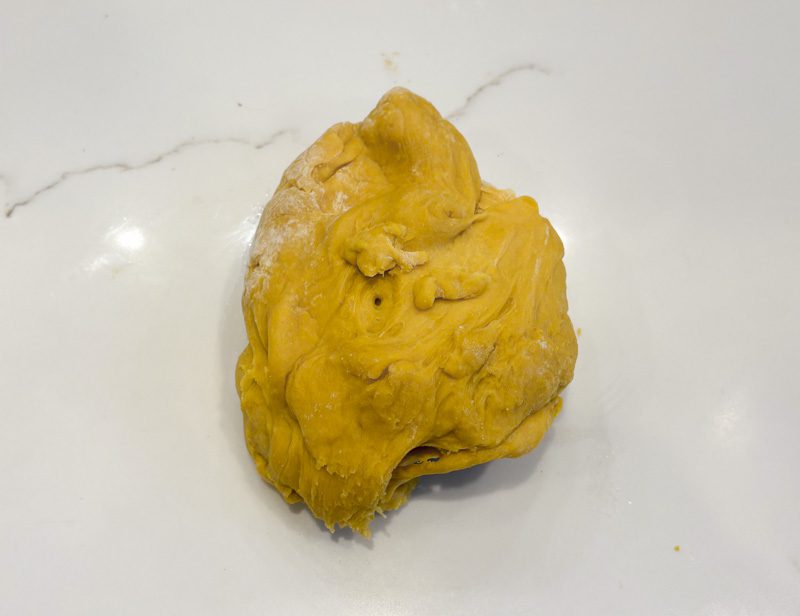
1. Make the dough & knead for 3-5 minutes.
Add to a mixing bowl (of a stand mixer if using one):
- 3 cups all purpose flour
- 1 1/4 tsp salt
Whisk together. Then add:
- 10 egg yolks
- 1 large egg
- 6 tbsp milk
If mixing by hand: Mix together all of the ingredients until you have a cohesive dough. Then gently knead the dough for about 3-5 minutes. (If you’re unclear on how to knead, see my note above.) It is normal for the dough to feel sticky at first. If it is very, very sticky, add a bit more flour, 1/2 tbsp at a time. You’ve finished kneading when the dough is a cohesive mass and no longer feels sticky.
If mixing with a stand mixer: Do not halve the recipe! (Or the dough hook might not reach the dough.) Mix together all of the ingredients using the stand mixer until you have a cohesive dough, scraping down the sides as needed. After it becomes a cohesive mass, let the mixer knead the dough for a solid 3 minutes on a slow setting. If the dough is not coming together, add a bit more milk (1/2 tbsp at a time). If the dough sticks to the bottom/sides of the bowl, there is a good chance you have too much liquid in there. Add more flour, 1/2 tbsp at a time.
2. Rest the dough for 30 minutes.
After kneading, cover the dough and allow it to rest for 30 minutes to 1 hour. There is no downside in going longer aside from the chance that your noodle dough could dry out a bit. If you’re going to need to go longer than 1 hour, cover the dough with plastic wrap or similar to minimize moisture loss.
Do you need to let it rest? You could probably get away with not resting, but the rest time will make your life easier. The rest time allows the gluten to relax. If the gluten does not relax, when you try to roll out the dough, it will fight you tooth and nail to stay clumped up as a ball. And after you roll it out, it will try to retract back to being in a ball. Because you want to roll it out without having it stick to the surface of the counter, you’re going to use flour, which will only help it achieve it’s goal of reverting to ball shape. Therefore, it is preferable in my experience to work with dough that has had time to chill. (Not literally though, keep it at room temp.)
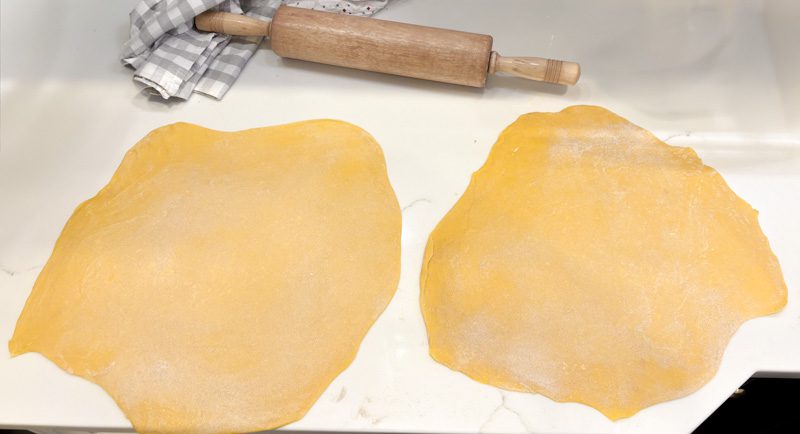
3. Roll out the noodles.
Divide the dough into two portions.
Dust each portion with flour and roll out until 1/8 – 1/16 inch thick, using flour as needed to ensure the sheets do not stick to the rolling pin or the counter surface. I usually do about 5 rolls with the rolling pin, apply a bit of flour to the top, flip over the dough, roll about 5 more times, and repeat the process.
Keep in mind that you are not going for paper thin noodles here. If the noodles are too thin, they will get soggy. I personally prefer them to be nearer to 1/8 of an inch thick so that they have a bit more of a bite to them.
Once both portions of dough are rolled out, set them aside to let them dry out a bit. You can lay them out flat on top of a clean kitchen towel to move them around if needed.
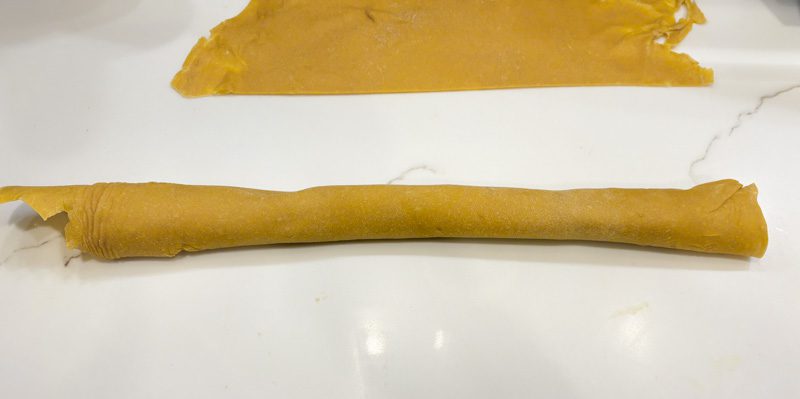
4. Let the noodle sheets dry.
Let them dry out for about 2 hours. Then flip over both sheets and let them dry for 2 more hours.
Ideally you want them to be dry on the surface, but still moist in the middle.
Do you need to dry the sheets? Drying out the dough sheets helps when you roll up the sheets and cut the noodles. You need dry surfaces on the dough sheets so that the noodles don’t stick to themselves when you cut, but you still want the sheets to be pliable so that you can roll them up. If you don’t have time to dry, you can try to compensate by adding more flour to the surface of the dough, but it won’t be as effective as drying and you’ll end up with starchier soup. Or you can cut the noodles by hand without rolling up the sheets (this will take longer and your noodles will be messier.)
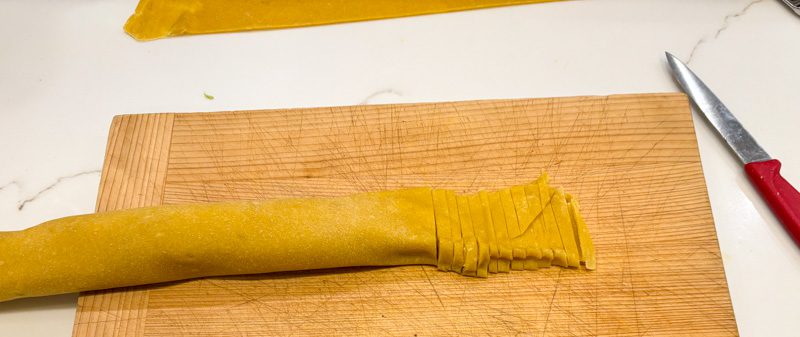
5. Cut the noodles
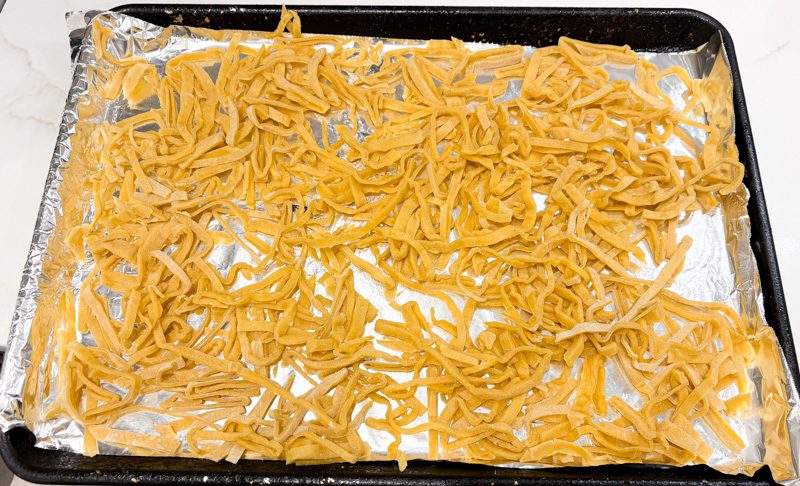
Prepare a lined baking sheet for your noodles to dry after cutting. I take 1/2 sheet pan and line it with aluminum foil or parchment paper.
After you’ve finished dried the noodle sheets for about 2 hours (as described above), cut each of the two dough sheets down the middle, so you have a total of 4 sheets. With the longer side of the noodle sheet toward your body, roll up the sheet of noodles (hotdog style – you want a long roll, not a short one, so that you cut lots of relatively short noodles, not a few very long noodles).
Then slice the rolled up noodle sheets so that you have noodles between 1/4 and 1/8 of an inch thick. My sweet spot is about 3/8 of an inch.
Place the noodles onto the baking sheet and toss them until they become unrolled. I find this is easier to do once I have cut all the noodles – it is easier to toss more noodles than a few.
6. Allow the noodles to dry or use immediately.
You can cook the noodles immediately. Cook them for 3-5 minutes depending on thickness.
Alternatively, allow the noodles to dry on the baking sheet. Toss them every 4-5 hours to ensure they fully dry. After about 1-2 days of drying (err on the side of longer), you can store them in an airtight container at room temperature. To cook from dry, they will take about 10-13 minutes, depending on thickness.